
This is a quick heart felt ornament. (I promise. It looks complicated, but it took me less than an hour.)
What you'll need:
100% feltable wool in red & gray. I used patons wool.
Size 8 needles (or whatever you have on hand, the gauge is not really important in this project. Use chunky wool and size 13 needles and your ornament will just be a big ornament and who doesn't love a big ornament?)
Tapestry needle
What you'll need to know (or learn - check out you tube!):
Knits & purls
Color work (intarsia)
Mattress stitch
felting via a big big boiling pot of water
Written pattern:
Cast on 25 stitches in gray.
Purl all gray.
Knit all gray.
Purl 12 gray, purl 1 red, purl 12 gray.
Knit 11 gray, knit 3 red, knit 11 gray.
Purl 10 gray, purl 5 red, purl 10 gray.
Knit 9 gray, knit 7 red, knit 9 gray.
Purl 8 gray, purl 9 red, purl 8 gray.
Knit 7 gray, knit 11 red, knit 7 gray.
Purl 6 gray, purl 13 red, purl 6 gray.
Knit 5 gray, knit 7 red, knit 1 gray, knit 7 red, knit 5 gray.
Purl 6 gray, purl 5 red, purl 3 gray, purl 5 red, purl 6 gray.
Knit 7 gray, knit 3 red, knit 5 gray, knit 3 red, knit 7 gray.
Purl 8 gray, purl 1 red, purl 7 gray, purl 1 red, purl 8 gray.
Knit all gray.
Purl all gray.
Bind off in gray.
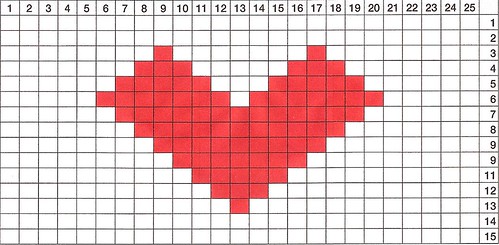
Chart pattern:
Final steps:
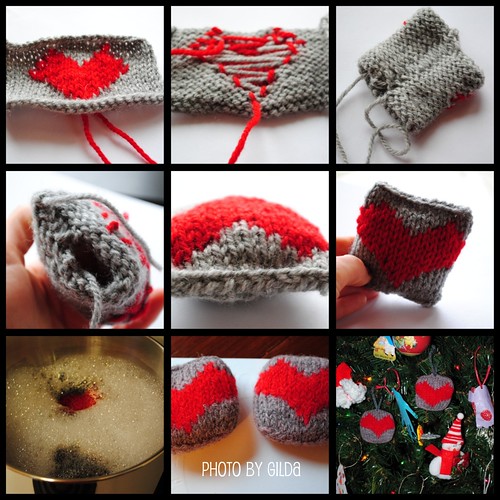
1. Fold in half width wise. Stitch seams together with mattress stitch.
2. With the side seam stitched and placed in the middle of the back, seam one side of the bottom and then the other, forming a square pouch.
3. Fill with polyfill.
4. Seam the top.
5. Place in boiling hot & soapy water. Agitate until felted the desired amount.
6. Put in dryer for quick drying and to fluff up polyfill.
7. Thread a scrap yarn into the top to form a loop for hanging on to tree.
8. Hang onto tree.
Tadahhhh. Enjoy!
And use this pattern many times over, but please do credit me if you post on your blog (in fact, link directly back to me. AND...if you have photos, put them in my flickr group.
EDITED TO ADD: Two things I missed: The chart pattern is supposed to be read bottom to top. Also, use polyfill if you have it, but you can also not fill it or use scraps of yarn lying around.
So cute! Awesome tutorial. :)
ReplyDeleteThank you!
ReplyDeleteWonderful...thank you....hope there will be more posts to come!!!
ReplyDeletewhat a super cute DIY ornament!! welcome to the blogging world! :D
ReplyDeletewooo, thanks for posting y'all!
ReplyDeleteI really like this .. would be a new technique for me .. hope I can do as good as yours.
ReplyDelete